LED and Light Circuit
12V Dimmer circuit
Published:2012/10/11 21:09:00 Author:muriel | Keyword: 12V, Dimmer | From:SeekIC


A dimmer is quite unusual in a caravan or on a boat. Here we describe how you can make one. So if you would like to be able to adjust the mood when you’re entertaining friends and acquaintances, then this circuit enables you to do so. Designing a dimmer for 12 V is tricky business.The dimmers you find in your home are designed to operate from an AC voltage and use this AC voltage as a fundamental characteristic for their operation. Because we now have to start with 12 V DC, we have to generate the AC voltage ourselves. We also have to keep in mind that we’re dealing with battery powered equipment and have to be frugal with energy.
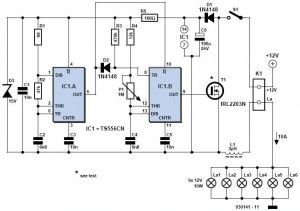
The circuit that we finally arrived at can easily drive 6 lamps of 10 W each. Fewer are also possible, of course. In any case, the total current has to be smaller than 10 A. L1 and S1 can be adapted to suit a smaller current, if required. Note that the whole circuit will also work from 6 V. IC1 is a dual timer. You could also use the old faithful NE556, but it draws a little more current. IC1a is wired as an astable multivibrator with a frequency of 180 Hz. IC1b is configured as a monostable and is triggered, via D2, from the positive edge at the output of IC1a.
The length of the pulse that now appears at the output of IC1b is dependant on the position of P1. IC1b will be reset whenever the output of IC1a goes low, independent of the pulse duration, set with P1, R4 and C4. This guarantees that the dimming is smooth, even when the brightness is set to maximum.
12Volt dimmer circuit diagram
The output of IC1b (pin 9) drives the gate of MOSFET T1. When the duration of the pulses at the gate increases, the average time that the MOSFET is in conduction will also increase. In this way the brightness of the lamps is controlled. T1 conducts about 96 % of the time when the brightness is set to maximum. In this configuration, this can never be 100 %, because the 4 % of the time that the FET does not conduct is necessary to charge C6.
If the FET were to conduct with 100 % duty cycle, the power supply for the circuit would be effectively short-circuited. C6 allows the circuit to ride through the conduction period of the FET. D1 ensures that the charge cannot leak away via the FET during the ‘on’ period.
In the schematic, an IRL2203N is indicated for T1, but in principle you could use just about any power transistor (for example, BUK455, BUZ10, BUZ11 or BUZ100). The IRL2203 does however, have a very low ‘on’ resistance (RDS ON) of only 7 mΩ and can switch 12-V loads up to 5 A without a heatsink. If you choose a different MOSFET (with higher RDS ON) or use the circuit in a 6-V system then you will likely need a heatsink.
Using the IRL2203N with six lamps rated 12 V / 10 W, T1 dissipates only 170 mW. At 6 V and 10 A this becomes 680 mW. The circuit itself consumes about 0.35 mA at maximum brightness and about 1.25 mA at minimum.
12 Volt dimmer pcb layout
Reprinted Url Of This Article:
http://www.seekic.com/circuit_diagram/LED_and_Light_Circuit/12V_Dimmer_circuit.html
Print this Page | Comments | Reading(3)

Article Categories
power supply circuit
Amplifier Circuit
Basic Circuit
LED and Light Circuit
Sensor Circuit
Signal Processing
Electrical Equipment Circuit
Control Circuit
Remote Control Circuit
A/D-D/A Converter Circuit
Audio Circuit
Measuring and Test Circuit
Communication Circuit
Computer-Related Circuit
555 Circuit
Automotive Circuit
Repairing Circuit
Code: