Basic Circuit
SOLID_STATE_WINDSHIELD_WIPER_DELAY
Published:2009/7/9 5:13:00 Author:May | From:SeekIC

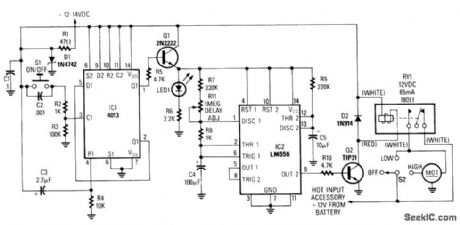
In the wiper-delay schematic shown, with the ignition on, D1 maintains regulated + 12 Vdc. When S1 closes, C1 bypasses transients and passes this + 12 Vdc to divider R2-R3, producing a TTL high at pin 3 of IC1, a 4013 CMOS dual leading-edge triggered D-type flip-flop. Filter R4/C3 keeps IC1 from triggering erroneously when the ignition is on. When S1 is pressed, output Q1 (pin 1) of IC1 latches high, turning on Q1, which conducts via R5, turning on IC2; LED1 indicates power, and R6 sets the current. Because IC2 depends on Q1 for power, IC2 stays off until Q1 turns on.
The left half of IC2 is an astable, with its delay set by R7, R8, R11, and C4. The right half of IC2 is a monostable, with its pulse duration set by R9 and C5. With the values used, you might expect R11 to vary the delay from about 15 to 84 seconds, with a 2.42-second monostable pulse operating the wiper blades on each cycle. However, the actual delay will range between 2 to 18 s, with a 1-s monostable pulse on each cycle. That discrepancy stems from the fact that IC2 is being fed from the emitter of Q1, rather than directly from the regulated +12-V supply. Transistor Q1 acts as an active current source, charges and discharges C4 faster than it ordinarily would.
The astable output (OUT1, pin 5) is tied to TRIG2 (pin 8). When OUT2 (pin 9) becomes high, Q2 is biased via RIO and current flows through RY1, with D2 dissipating back-emf when RY1 shuts off.
Reprinted Url Of This Article:
http://www.seekic.com/circuit_diagram/Basic_Circuit/SOLID_STATE_WINDSHIELD_WIPER_DELAY.html
Print this Page | Comments | Reading(3)

Article Categories
power supply circuit
Amplifier Circuit
Basic Circuit
LED and Light Circuit
Sensor Circuit
Signal Processing
Electrical Equipment Circuit
Control Circuit
Remote Control Circuit
A/D-D/A Converter Circuit
Audio Circuit
Measuring and Test Circuit
Communication Circuit
Computer-Related Circuit
555 Circuit
Automotive Circuit
Repairing Circuit
Code: