Automotive Circuit
FLASHING_BRAKE_LIGHT
Published:2009/6/16 2:19:00 Author:May | From:SeekIC

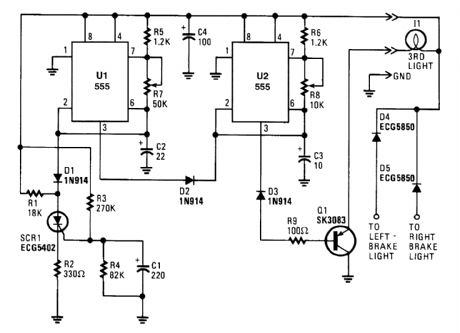
When power is first applied, three things happen: the light-driving transistor (Q1) is switched on because of a low output from U2, pin 3; timer U1 begins its timing cycle, with the output (pin 3) going high, inhibiting U2's trigger (pin 2) via D2; and charge current begins to move through R3 and R4 to C1.When U1's output goes low, the inhibiting bias on U2 pin 2 is removed, so U2 begins to oscillate, flashing the third light via Q1, at a rate determined by R8, R6, and C3. Oscillation continues until the gate-threshold voltage of SCR1 is reached, causing it to fire and pull U1's trigger (pin 2) low. With its trigger low, U1's output is forced high, disabling U2's triggering. With triggering inhibited, U2's out-put switches to a low state, which makes Q1 conduct, turning on I1 until the brakes are released. Removing power from the circuits resets SCR1, but the RC network consisting of R4 and C1 will not discharge immediately and will trigger SCR1 earlier. So, frequent brake use means fewer flashes.Bear in mind that the collector/emitter voltage drop across Q1, along with the loss across the series-fed diodes, reduces the maximum available light output. If the electrical system is functioning properly (at 13 to 14 V for most vehicles), those losses will be negligible.
Reprinted Url Of This Article:
http://www.seekic.com/circuit_diagram/Automotive_Circuit/FLASHING_BRAKE_LIGHT.html
Print this Page | Comments | Reading(3)

Article Categories
power supply circuit
Amplifier Circuit
Basic Circuit
LED and Light Circuit
Sensor Circuit
Signal Processing
Electrical Equipment Circuit
Control Circuit
Remote Control Circuit
A/D-D/A Converter Circuit
Audio Circuit
Measuring and Test Circuit
Communication Circuit
Computer-Related Circuit
555 Circuit
Automotive Circuit
Repairing Circuit
Code: