
Project Solutions
HIGH-END POWER AMP-High-class watts (6)
Published:2011/8/21 21:46:00 Author:Phyllis From:SeekIC
By Ton Giesbets
Don’t solder the driver transistors, output transistors or quiescent-current transistor to the circuit board just yet. The leads of these transistors must first bent to the right spacing, so they can rest properly on the heat sink without any mechanical strain after being fitted. That is described in detail under ’Final assembly’.
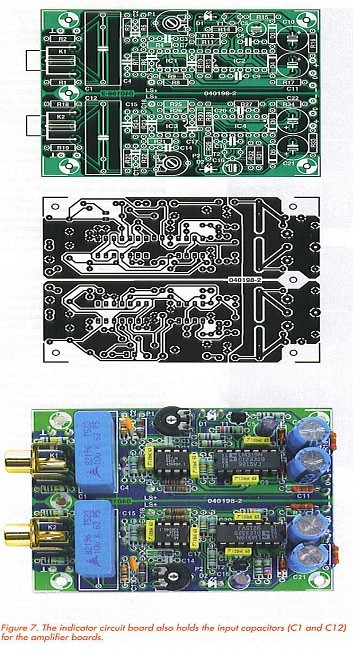
Next comes the indicator circuit board (Figure 7). It doesn’t involve much out of the ordinary. R16, R17, R33 and R34 must be fitted a bit above the board and bent slightly away from the decoupling capacitors, since they must dissipate a fair amount of heat. If you wish, you can use a multimeter to adjust presets PI and P2 to 210 £1 before soldering them to the board (refer to ’Alignment’ at the end of the article). For CI and C2, be sure to buy a type that has the right dimensions to fit on the circuit board. 
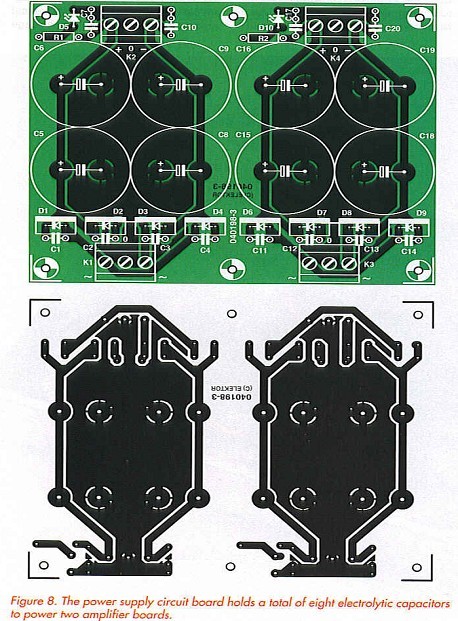
The power supply board shown in Figure 8 can be quickly put together, but here again you must be sure to use capacitors with the right dimensions and the proper type of Schottky diode. Don’t forget the wire bridges under and between D2/D3 and D7/D8. 
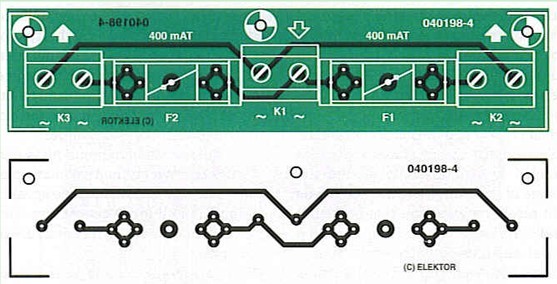
Finally there is the small circuit board with the mains fuses and terminal blocks for distributing the mains voltage (Figure 9). Of course, this board isn’t essential, but it makes the wiring quite a bit easier (and safer!). 
Final assembly
As we already mentioned, the amplifier uses the same type of enclosure as the ’High-End preamp’ preamp. That’s why we went to so much trouble to keep everything as compact as possible. For the heat sinks, we looked for types that were not too long and still had sufficiently low thermal resistance. We finally settled on the Fisher SK411, which with its modest dimensions of 116.5× 50×50 mm leaves enough space between the heat sinks to fit the loudspeaker terminals (using relatively small types) and the input connectors. To maximise the available space, we milled a 1.7-mm rebate around the edge of the heat sinks, so their bases fit nicely between the two fastening rails. This also causes the edges of the heat sinks to be flush with the side faces of the enclosure. Each heat sink is secured by four M3 screws fitted through the heat sink and the rails.
The head of an M3 screw will fit between the cooling fins of this type of heat sink. In principle, the output transistors could be attached the same way. This would make assembly a bit easier, but it would also make the circuit board unnecessarily large.
A small 1.5-mm aluminium plate can be fitted between the two heat sinks (measure carefully) to hold the speaker terminals and input connectors. The original rear panel of the enclosure is not used.
There’s actually not any room left for the mains cable (and certainly not for an IEC mains inlet). In our prototype, we used a sturdy mains cable and strain relief routed through the bottom plate next to the circuit board with the fuses. In this case, the enclosure must rest on high feet that are high enough to prevent the mains cable from being pinched off.
Fit the mains transformers as close as possible to the front panel. The mains switch and LEDs from the overdrive indicator can then be fitted on either side of the fuse circuit board and the transformers. Attach the fuse circuit board to the base plate using 10-mm standoff sleeves with nylon screws and nuts (the terminal blocks we used are partially open at the rear). This ensures Class-II isolation (be sure to read the instructions on the ’Safety Guidelines’ page). In general, always pay careful attention to the isolation of components carrying mains voltage. Maintain a distance of at least 6 mm from parts that can be touched by users.
Reprinted Url Of This Article: http://www.seekic.com/blog/project_solutions/2011/08/21/HIGH_END_POWER_AMP_High_class_watts_(6).html
Print this Page | Comments | Reading(1467)
Article Categories
New published articles
· Imagination works with TSMC to develop FinFET process
Author:Ecco Reading(33516)
· XMOS pushes event-driven MCUs with lower price
Author:Ecco Reading(3534)
· Intel brings upgraded 32-nm SoC for smartphones
Author:Ecco Reading(3250)
· Micron pushes TLC 128-Gbit NAND flash
Author:Ecco Reading(3816)
· Intel will stop supplying desktop motherboards
Author:Ecco Reading(5341)
· Processor market was expected to regain strength in 2013
Author:Ecco Reading(3318)
· It was reported that TSMC sales fall steeply
Author:Ecco Reading(3474)
· Cisco, NXP work with auto wireless startup
Author:Ecco Reading(3620)
· Micron was impacted by manufacturing glitch
Author:Ecco Reading(4017)
· China can make 22-nm transistor by themselves
Author:Ecco Reading(3819)
· Chip market rebound is coming, according to survey
Author:Ecco Reading(3760)
· Sony, Toshiba will spend more on chips, iSuppli reports
Author:Ecco Reading(3790)
· Qualcomm becomes the 13th company to join NFC Forum board
Author:Ecco Reading(6103)
· TSMC increases building work for FinFET fab
Author:Ecco Reading(3778)
· TI plans to cut 1,700 jobs in OMAP shift
Author:Ecco Reading(4587)